Kitchen Renovation - Phase 2
5:30 AM
The second phase of the kitchen renovation began in 2015 and involved replacing the tile countertops and backsplash with marble and subway tiles, respectively. I also changed out my cast-iron sink with a farmhouse sink, installed a new faucet, replaced all the cabinet door and drawer fronts, put in slide-out shelving for my heavy pots and pans, put wooden lazy susans in my corner lower cabinetry and installed new pendant lights over the sink work area. And last but not least, painted all the new cabinetry.
The first step was the selection of marble. I picked out a slab of Carrera marble - the one pictured above. It's funny how you can fall in love with a piece of marble. It happens. Trust me.
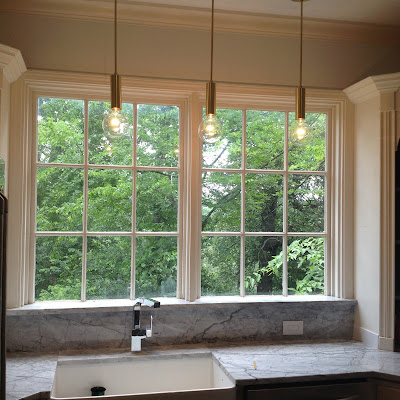
One key complaint I had about my sink area was the window sill behind the sink. It was, as you can see, very faceted and caught all kinds of dirt, grime, splashes, etc. In short, it was a total pain to keep clean and looked cluttered to me. I wanted that changed as part of the marble installation.
We experimentally repainted the brown walls a white color, which ended up appearing slightly lavender to me. I decided to change the color along the way, but when the hard work began on the kitchen, the walls were white.
Here are the "before" pictures of the cabinet fronts, backsplash and countertops.
Rather than hiring a contractor for this, I sourced it all and hired all the individual specialists myself. I ordered all the "things", the Blanco farmhouse sink, lighting, hardware, wooden lazy susans...all online on various websites. I ended up saving tons of money doing it this way. I estimate (from quotes I was given) that I saved about $10,000 being my own contractor.
Obviously, before work can begin, the room must be cleared.
What an amazing sight that is!
But then it all has to go someplace....which ended up being my dining room table.
I ended up finding a marble fabricator who fabricated and installed my countertops, as well as removing my countertops and the backsplash and installing the subway tiles for me. He was wonderful, and I ended up using him to do my recent master bathroom renovation.
In the process of removing the old tiles, several ants nests were discovered in the insulation behind it. Talk about absolutely disgusting. I hate ants more than just about anything.
The sink in place and awaiting its marble top.
Also waiting for its marble...
And there it is. Masterfully fit into the corner cabinets and looking truly truly fabulous.
The veining of this particular slab looked almost like statuarietto marble, but it's not! It's carrerra which is much less expensive than the more heavily veined statuarietto.
Sink in place. Marble in place. New faucet installed.
I loved the squared off, modern faucet. It's from Danze.
So pretty!
Subway tile goes up next.
Getting closer!
New shaker front cabinet doors were next.
Even unpainted, they were a huge improvement.
And you can see the ledge that was built for me at the base of the windows to replace the elaborate sills that used to be there. Simple, elegant.
The other side of the room.
A different view...
Then the lights! I ordered pendant lights from Cedar and Moss, a Portland-based company. I have since ordered additional lights from them and continue to be impressed.
The light these now shed on my sink/work area was a vast improvement!
Here is one of the corner cabinets which house some huge lazy susans. They were plastic and cracking and also had a big pie-wedge missing which didn't make sense for the space. I removed them and replaced them with wooden, D-shaped ones which fit the space perfectly.. I did the removal and installation myself.
It involved a fair amount of wiggling around on my back in a tight space, but was very satisfying!
Mid-spin, they are not lined up evenly in the picture. But they are strong, sturdy and functional!
During our week vacation to Captiva last year, the upper and lower cabinets were painted for us.
The lower cabinets are Sherwin-Williams Naval, and the upper cabinets are Sherwin Williams Origami White.
It made me indescribably happy to see it all taking shape and color.
I love the crispness of this room. The navy, grey marble, white subway tiles and cabinets, silver appliances.
And the sink perspective.
I installed all the hardware myself, too.
A lesson in measuring and lots of patience.
It truly just makes me happy.
It looked so wonderful without anything in there, it was really hard to put my things back. And I did pare back as much as I could on what went onto the counters.
Above is the "Before" new counters and cabinets, etc.
AFTER
BEFORE
AFTER


1 comments
So, so pretty! So glad I got to see it in person!
ReplyDelete